Forex Trading Terminology: Key Terms You Must Know. Diving headfirst into the world of forex trading? Think of it like learning a new language – one filled with acronyms, jargon, and enough technical terms to make your head spin. But don’t worry, newbie! Mastering the lingo is the first step to navigating this exciting (and potentially lucrative) market. We’re breaking down the essentials, so you can confidently chat with seasoned traders and avoid those rookie mistakes that can cost you big time.
This guide will demystify the core concepts, from understanding currency pairs and leverage to mastering chart analysis and risk management. We’ll equip you with the vocabulary and knowledge to confidently take your first steps in the forex market. Get ready to unlock the secrets of this global financial powerhouse.
Introduction to Forex Trading
Forex trading, or foreign exchange trading, is the global marketplace where currencies are bought and sold. It’s the largest and most liquid financial market in the world, dwarfing even the stock market in terms of daily trading volume. Understanding forex is crucial for anyone interested in international finance, as it impacts everything from import/export prices to global economic stability. Essentially, you’re betting on the relative value of one currency against another.
Forex trading operates on a decentralized, over-the-counter (OTC) network, meaning there’s no central exchange. Trading happens electronically between banks, institutions, and individual traders. The basic unit of trading is the currency pair, representing the exchange rate between two currencies. For example, EUR/USD represents the Euro against the US Dollar. If the pair is quoted at 1.1000, it means 1 Euro can be exchanged for 1.10 US Dollars. A rise in this number indicates the Euro is strengthening against the Dollar, and vice-versa.
Forex Trading Account Types
Choosing the right forex trading account is a critical first step for any trader. Different account types cater to varying levels of experience and trading styles. Each type offers unique features and cost structures, impacting your trading strategy and potential profitability.
- Demo Accounts: These are risk-free practice accounts that use virtual money. They allow new traders to familiarize themselves with the platform, practice strategies, and develop trading skills without risking real capital. Think of it as a virtual driving school before hitting the actual road.
- Standard Accounts: These accounts use real money and offer standard leverage levels. They are suitable for beginners and intermediate traders who want to trade with manageable risk. Leverage magnifies both profits and losses, so responsible risk management is crucial.
- ECN (Electronic Communication Network) Accounts: These accounts provide direct access to the interbank market, offering tighter spreads (the difference between the buy and sell price) and faster execution speeds. ECN accounts are typically preferred by experienced traders who prioritize speed and low transaction costs. They often require larger minimum deposits and may have higher commission fees.
Core Forex Terminology
Navigating the forex market requires understanding its fundamental building blocks. This section dives into the core terminology, starting with the most actively traded currency pairs – the major pairs. These pairs form the backbone of forex trading volume and influence the overall market sentiment. Understanding their characteristics is crucial for any aspiring forex trader.
Major Currency Pairs
Eight currency pairs dominate forex trading volume, known as the majors. Their high liquidity makes them attractive to traders of all sizes, offering tighter spreads and easier execution. However, their popularity also means that they can be highly volatile, requiring careful risk management. These pairs are typically composed of the US dollar paired with other major global currencies.
| Currency Pair | Symbol | Characteristics | Volatility |
|---|---|---|---|
| EUR/USD (Euro/US Dollar) | EURUSD | Most liquid pair; reflects Eurozone and US economic health. | Moderate to High |
| USD/JPY (US Dollar/Japanese Yen) | USDJPY | Sensitive to interest rate differentials; influenced by global risk sentiment. | Moderate to High |
| GBP/USD (British Pound/US Dollar) | GBPUSD | Reflects UK economic performance and global market sentiment. | Moderate to High |
| USD/CHF (US Dollar/Swiss Franc) | USDCHF | Often acts as a safe haven during times of uncertainty. | Moderate |
| USD/CAD (US Dollar/Canadian Dollar) | USDCAD | Closely tied to commodity prices, particularly oil. | Moderate |
| AUD/USD (Australian Dollar/US Dollar) | AUDUSD | Sensitive to commodity prices and Australian economic data. | Moderate to High |
| NZD/USD (New Zealand Dollar/US Dollar) | NZDUSD | Similar to AUD/USD, influenced by commodity prices and New Zealand’s economy. | Moderate to High |
| USD/NOK (US Dollar/Norwegian Krone) | USDNOK | Closely linked to oil prices and the Norwegian economy. | Moderate to High |
Factors Influencing Major Currency Pair Values
Several interconnected factors influence the value of these major currency pairs. Economic indicators, such as interest rates, inflation, GDP growth, and unemployment rates, play a significant role. Government policies, geopolitical events, and market sentiment also exert considerable influence. For instance, a surprise interest rate hike by the Federal Reserve (the US central bank) would typically strengthen the US dollar against other currencies. Conversely, negative economic news about the Eurozone could weaken the Euro against the US dollar. The interplay of these factors creates the dynamic environment characteristic of forex trading.
Understanding Leverage and Margin
Forex trading, with its potential for high returns, also carries significant risk. Understanding leverage and margin is crucial for navigating this landscape successfully, mitigating potential losses, and maximizing profits. These two concepts are intrinsically linked and form the bedrock of responsible forex trading.
Leverage in forex trading allows you to control a larger position in the market than your initial capital would normally permit. Think of it as borrowing money from your broker to amplify your trading power. For example, a leverage ratio of 1:100 means you can control $100,000 worth of currency pairs with only $1,000 of your own money. While leverage can magnify profits, it equally magnifies losses. A small market movement against your position can quickly wipe out your account if not managed carefully. The benefits lie in the potential for greater returns on smaller investments, but the risks are equally substantial, making proper risk management paramount.
Leverage Levels and Their Implications
Different brokers offer various leverage levels, typically ranging from 1:10 to 1:500 or even higher. Higher leverage magnifies both profits and losses exponentially. A 1:500 leverage means a 0.2% movement against your position will result in a 100% loss of your margin. Lower leverage levels, like 1:10 or 1:20, offer greater stability but limit potential gains. The choice of leverage depends heavily on your trading style, risk tolerance, and experience. Experienced traders might utilize higher leverage, but only with robust risk management strategies in place, such as stop-loss orders. Conversely, novice traders are generally advised to start with lower leverage to gain experience and minimize potential losses. Choosing the appropriate leverage is a crucial element of risk management.
Margin Requirements
Margin is the amount of money you must deposit with your broker to open and maintain a leveraged position. It acts as collateral, ensuring the broker is protected against potential losses. The margin requirement is calculated as a percentage of the total position size. For instance, if the margin requirement is 1% and you want to trade $10,000 worth of currency pairs, you need to deposit $100 as margin. If the market moves against your position, and your account equity falls below the required margin level, your broker might issue a margin call, demanding additional funds to maintain your position. Failure to meet a margin call can lead to the liquidation of your position, resulting in significant losses. The margin requirement is directly affected by the leverage used; higher leverage necessitates a smaller margin percentage, while lower leverage requires a larger margin percentage. This directly impacts the capital required to open a trade.
Margin Calls and Risk Management
A margin call is a notification from your broker that your account equity has fallen below the required margin level for your open positions. This signifies that your losses are approaching the point where your margin deposit is insufficient to cover potential further losses. The broker may then automatically close (liquidate) your positions to prevent further losses, potentially leading to substantial losses for the trader. Effective risk management strategies, including using stop-loss orders to limit potential losses, are essential to prevent margin calls. Diversifying your portfolio across different currency pairs and consistently monitoring your account balance are also crucial aspects of managing risk and avoiding margin calls. Understanding the mechanics of margin calls is crucial for navigating the forex market effectively and mitigating losses.
Key Forex Orders and Their Execution
Navigating the forex market successfully hinges on understanding and effectively using different order types. Choosing the right order is crucial for managing risk and achieving your trading goals. This section breaks down the most common forex orders and guides you through their execution.
Understanding how to place and manage these orders on your trading platform is essential for executing your trading strategy. The process is generally similar across platforms, but specifics might vary slightly depending on the broker you use. Always familiarize yourself with your chosen platform’s interface and features.
Market Orders
Market orders are straightforward. They instruct your broker to execute your trade immediately at the best available market price. This is ideal for traders who want to enter a position quickly, without specifying a particular price. However, because the price is not guaranteed, there’s a risk of slippage—the difference between the expected price and the actual execution price. This is particularly true during periods of high volatility or low liquidity. Think of it like buying something at a busy auction – you’re hoping to get a good price, but you might end up paying a little more (or less) than you initially anticipated.
Limit Orders
Unlike market orders, limit orders allow you to set a specific price at which you want to buy or sell. Your order will only be executed if the market price reaches your specified limit. This helps control risk by preventing you from entering a trade at an unfavorable price. For example, if you’re looking to buy EUR/USD, you might set a buy limit order at 1.1000. This means your trade will only be executed if the price of EUR/USD drops to 1.1000 or lower. Conversely, a sell limit order would be used to sell at or above a specified price. This is a great strategy for taking advantage of potential price dips or rebounds.
Stop Orders
Stop orders are designed to limit potential losses or protect profits. A buy stop order is placed above the current market price, and is triggered when the price rises to your specified level. This can be used to enter a long position after a breakout. Conversely, a sell stop order is placed below the current market price, triggered when the price falls to your specified level. This can be used to limit losses on a short position or to lock in profits. For example, if you’re holding a long position in GBP/USD and the price suddenly starts dropping, you could set a sell stop order to limit your losses if the price falls below a certain level.
Step-by-Step Guide: Executing a Market Order
- Log in to your trading platform: Access your brokerage account and navigate to the trading interface.
- Select the currency pair: Choose the forex pair you wish to trade (e.g., EUR/USD).
- Specify the trade volume: Determine the amount of currency you want to buy or sell (e.g., 10,000 units).
- Choose “Market Order”: Select the market order type from the available options.
- Click “Buy” or “Sell”: Execute the order based on your desired trading direction.
Step-by-Step Guide: Executing a Limit Order
- Log in to your trading platform: Access your brokerage account and navigate to the trading interface.
- Select the currency pair: Choose the forex pair you wish to trade (e.g., GBP/USD).
- Specify the trade volume: Determine the amount of currency you want to buy or sell (e.g., 5,000 units).
- Choose “Limit Order”: Select the limit order type.
- Enter the limit price: Input the specific price at which you want the order to be executed (e.g., 1.3000 for a buy order).
- Click “Buy” or “Sell”: Place your order. The order will remain pending until the market price reaches your specified limit.
Analyzing Forex Charts and Indicators
Navigating the forex market successfully requires more than just understanding basic terminology and order types. A crucial skill lies in interpreting market movements through chart analysis and technical indicators. These tools help traders identify potential trends, predict price reversals, and manage risk more effectively. Let’s delve into the world of chart patterns and the insights offered by key technical indicators.
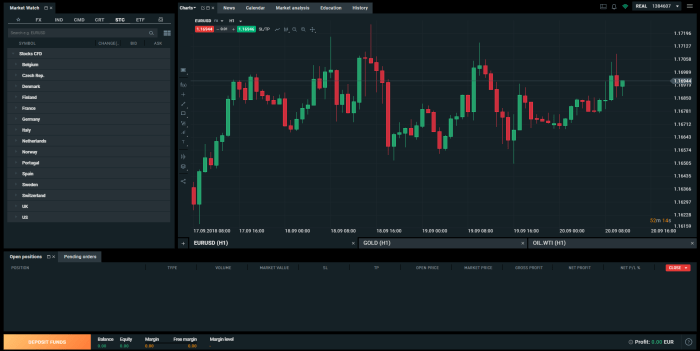
Chart Types in Forex Trading
Forex traders primarily utilize three types of charts: candlestick, bar, and line charts. Each offers a slightly different visual representation of price data, allowing traders to choose the style best suited to their analytical preferences and trading strategies. Candlestick charts are particularly popular due to their ability to visually represent both the opening and closing prices, as well as the high and low for a specific time period (e.g., one hour, one day). Bar charts provide similar information, but with a simpler, less visually detailed presentation. Line charts connect the closing prices of each period, offering a clean representation of price trends over time, often used for identifying long-term trends. The choice of chart type often depends on individual trader preferences and the specific timeframe being analyzed.
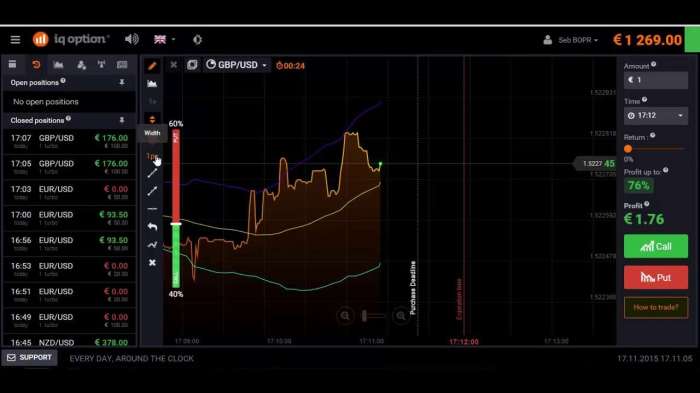
Technical Indicators: Moving Averages
Moving averages smooth out price fluctuations, revealing underlying trends. They are calculated by averaging prices over a specific period (e.g., 10-day, 20-day, 50-day moving averages). A simple moving average (SMA) gives equal weight to each data point, while an exponential moving average (EMA) assigns greater weight to more recent prices, making it more responsive to recent price changes. Traders often use multiple moving averages simultaneously; for example, a crossover of a shorter-term moving average above a longer-term moving average might be interpreted as a bullish signal, suggesting a potential upward trend. Conversely, a bearish crossover occurs when the shorter-term moving average falls below the longer-term one. The specific periods used for the moving averages vary depending on the trader’s time horizon and trading strategy.
Technical Indicators: Relative Strength Index (RSI)
The RSI is a momentum oscillator that measures the magnitude of recent price changes to evaluate overbought or oversold conditions. It ranges from 0 to 100. Readings above 70 are generally considered overbought, suggesting a potential price reversal to the downside. Readings below 30 are considered oversold, hinting at a potential upward correction. The RSI is not a foolproof predictor, and false signals can occur. However, when used in conjunction with other indicators and chart patterns, it can provide valuable insights into potential market turning points. For example, a stock with an RSI consistently above 70 might experience a correction, offering a buying opportunity for a swing trader.
Technical Indicators: Moving Average Convergence Divergence (MACD), Forex Trading Terminology: Key Terms You Must Know
The MACD is a trend-following momentum indicator that shows the relationship between two moving averages. It consists of a MACD line (the difference between a 12-period and 26-period exponential moving average) and a signal line (a 9-period moving average of the MACD line). Buy signals often occur when the MACD line crosses above the signal line, while sell signals occur when the MACD line crosses below the signal line. Divergences between the MACD and price action can also provide valuable insights. For instance, a bullish divergence occurs when the price makes lower lows, but the MACD makes higher lows, potentially indicating a bullish reversal.
Comparison of Indicators
Understanding the strengths and weaknesses of each indicator is crucial for effective trading.
You also can understand valuable knowledge by exploring How to Succeed in Forex Trading: A Roadmap for 2025.
- Moving Averages:
- Strengths: Simple to understand and use; good for identifying trends.
- Weaknesses: Lagging indicator; can generate false signals in choppy markets.
- RSI:
- Strengths: Identifies overbought and oversold conditions; useful for identifying potential reversals.
- Weaknesses: Prone to false signals; requires confirmation from other indicators.
- MACD:
- Strengths: Identifies trends and potential reversals; useful for identifying divergences.
- Weaknesses: Can generate false signals; requires confirmation from other indicators.
Risk Management Strategies in Forex Trading
Forex trading, while potentially lucrative, is inherently risky. Uncontrolled risk can lead to significant financial losses, wiping out your trading capital in a matter of days. Effective risk management is not just a good idea; it’s absolutely crucial for long-term success and survival in this volatile market. It’s about protecting your capital and ensuring you can continue trading even after experiencing losses.
Risk management involves a set of strategies and techniques designed to limit potential losses and maximize the probability of achieving your trading goals. It’s not about avoiding risk altogether—that’s impossible—but about managing it intelligently so that it works for you, not against you. This involves a disciplined approach, carefully considered decisions, and a commitment to following a well-defined plan.
Stop-Loss Orders
Stop-loss orders are crucial for limiting potential losses on any given trade. They’re automatic orders that instruct your broker to sell a currency pair if the price drops to a predetermined level. This level is set below your entry price, defining your maximum acceptable loss. For example, if you buy EUR/USD at 1.1000 and set a stop-loss at 1.0950, your maximum loss per unit will be 50 pips (points). This ensures that even if you’re away from your computer or are caught off guard by a sudden market movement, your losses are capped. It’s important to choose stop-loss levels strategically, considering factors like volatility and your risk tolerance. Setting a stop-loss too tightly might lead to frequent exits from profitable trades, while setting it too loosely can expose you to excessive losses.
Position Sizing
Position sizing determines the amount of capital you allocate to each trade. It’s a crucial element of risk management, as it directly influences the potential impact of a losing trade on your overall account balance. A common rule of thumb is to risk no more than 1-2% of your trading capital on any single trade. For instance, with a $10,000 account and a 1% risk tolerance, your maximum loss per trade should be $100. This ensures that even a series of losing trades won’t significantly deplete your capital. Calculating position size requires considering your stop-loss level and the lot size (the number of units of currency you’re trading). Different brokers offer calculators to simplify this process.
Hypothetical Trading Scenario
Let’s imagine you’re trading GBP/USD. You believe the pair is likely to rise, so you decide to buy at 1.3000. You have a $5,000 trading account and are comfortable risking 1%, or $50 per trade. Your analysis suggests a potential support level at 1.2950. You place a stop-loss order at 1.2950, limiting your potential loss to 50 pips. Using your broker’s position size calculator (considering your chosen lot size and stop-loss), you determine the appropriate lot size to maintain your 1% risk threshold. If the trade goes as planned and the price rises to 1.3100, you would then close your position and lock in your profit. However, if the price falls to your stop-loss level of 1.2950, your loss would be limited to $50, preventing a more substantial loss to your account. This demonstrates how stop-loss orders and position sizing work together to protect your capital.
Fundamental Analysis in Forex Trading
Fundamental analysis is the bedrock of successful long-term forex trading strategies. Unlike technical analysis, which focuses on chart patterns and price movements, fundamental analysis delves into the underlying economic factors that influence currency values. By understanding these factors, traders can make informed decisions about which currencies are likely to appreciate or depreciate, leading to potentially profitable trades. This involves analyzing macroeconomic indicators and geopolitical events to predict future currency movements.
Understanding the interplay of various economic factors is crucial for predicting currency movements. These factors often influence each other, creating a complex web of cause and effect. For example, high inflation might lead a central bank to raise interest rates, which in turn could attract foreign investment and strengthen the currency. However, excessively high interest rates could also stifle economic growth, ultimately weakening the currency. Therefore, a nuanced understanding of the entire economic landscape is vital.
Key Economic Indicators and Their Impact on Exchange Rates
Several key economic indicators provide valuable insights into a country’s economic health and consequently, its currency’s value. These indicators offer a snapshot of the current economic situation and help forecast future trends. Misinterpreting these indicators can lead to significant losses, emphasizing the need for careful analysis and consideration of multiple factors.
- Inflation: Measured by indices like the Consumer Price Index (CPI) and Producer Price Index (PPI), inflation reflects the rate at which prices for goods and services are increasing. High inflation typically weakens a currency because it erodes purchasing power. For example, if a country experiences consistently high inflation compared to its trading partners, its goods become more expensive, reducing demand and weakening its currency. Conversely, low and stable inflation is generally viewed positively.
- Interest Rates: Set by a country’s central bank, interest rates influence borrowing costs and investment flows. Higher interest rates attract foreign investment, increasing demand for the currency and strengthening its value. The US Federal Reserve’s interest rate hikes in 2022, for instance, led to a strengthening of the US dollar as investors sought higher returns.
- Gross Domestic Product (GDP): GDP represents the total value of goods and services produced within a country’s borders. Strong GDP growth usually indicates a healthy economy and a strong currency. Conversely, weak or negative GDP growth can signal economic trouble and lead to currency depreciation. The impact of the COVID-19 pandemic on global GDP, for example, led to significant currency fluctuations as countries grappled with economic uncertainty.
- Unemployment Rate: A low unemployment rate suggests a strong economy with high consumer spending and confidence, which can support currency strength. Conversely, a high unemployment rate can signal economic weakness and potentially lead to currency depreciation. The relationship between unemployment and currency value is not always straightforward and needs to be analyzed in conjunction with other indicators.
- Trade Balance: The difference between a country’s exports and imports. A trade surplus (exports exceeding imports) typically strengthens a currency, while a trade deficit (imports exceeding exports) can weaken it. For example, China’s significant trade surplus has historically supported the value of the Chinese Yuan.
Interpreting Economic Indicators and Their Impact on Trading Decisions
Interpreting economic indicators requires a holistic approach, considering the interplay of various factors and the specific context of the country’s economy. It’s not enough to simply look at the raw numbers; the trend, the rate of change, and the comparison to expectations are equally important.
For example, a slightly higher-than-expected inflation rate might be viewed positively if it signals a healthy economy with strong demand. However, a significantly higher-than-expected inflation rate could be a cause for concern, leading to a weakening of the currency. Similarly, a rise in interest rates is generally positive for a currency, but excessively high interest rates could stifle economic growth and ultimately lead to a decline.
Successful traders utilize economic calendars and news releases to stay updated on the latest economic data. They also incorporate this information into their trading strategies, adjusting their positions based on their assessment of the potential impact of the released data on currency values. This involves considering the potential market reaction to the news, the overall economic climate, and other relevant factors. It’s a continuous process of analysis and adaptation.
Illustrating Pip Value and its Calculation
Understanding pip value is crucial for forex traders because it directly impacts profit and loss calculations. A small change in price can translate to significant gains or losses depending on the pip value and the trade size. This section will clarify what a pip is and how to calculate its value in various scenarios.
A pip, or point in percentage, is the smallest price movement a currency pair can make. For most currency pairs, a pip is 0.0001. However, for currency pairs involving the Japanese yen (JPY), a pip is 0.01. Knowing this is fundamental to accurately assessing potential profits and losses. The significance of a pip lies in its direct relationship to your account currency and the number of units traded. A larger trade size magnifies the impact of even a small pip movement.
Pip Value Calculation
The pip value is calculated based on several factors: the currency pair traded, the lot size (trade size), and the account currency. The general formula for calculating pip value is:
Pip Value = (Pip in decimal form) x (Lot size) x (Exchange rate of the quote currency to the account currency)
Let’s break this down with examples. Assume a standard lot size of 100,000 units.
Examples of Pip Value Calculation
Let’s consider a trader with a USD account.
Example 1: EUR/USD
Suppose the trader is trading EUR/USD, and the current exchange rate is 1.1000. A standard lot (100,000 units) means that a one-pip movement (0.0001) will move the price by $10.
Calculation: Pip Value = 0.0001 x 100,000 x 1 = $10
This means that for every pip movement in the EUR/USD pair, the trader will either gain or lose $10.
Example 2: USD/JPY
Now, let’s look at USD/JPY. Let’s say the exchange rate is 110.00. Remember that a pip in JPY pairs is 0.01. Using the same 100,000 unit lot size, the calculation is:
Calculation: Pip Value = 0.01 x 100,000 / 110.00 = $9.09 (approximately)
In this case, each pip movement is worth approximately $9.09 for the trader with a USD account. The division by the exchange rate is necessary because we are converting the JPY value of the pip movement into USD.
Example 3: GBP/USD with a Micro Lot
For a trader using a micro lot (1,000 units) and trading GBP/USD at an exchange rate of 1.3000, the calculation would be:
Calculation: Pip Value = 0.0001 x 1000 x 1.3000 = $0.13
This shows that the pip value significantly decreases with smaller lot sizes.
These examples highlight the importance of understanding pip value before entering any forex trade. Accurate calculation helps traders effectively manage risk and project potential profits and losses. Different brokers may also have slightly varying calculations based on their specific pricing and commission structures, so it is always wise to check with your broker for precise details.
Common Forex Trading Mistakes to Avoid: Forex Trading Terminology: Key Terms You Must Know
Navigating the forex market can be incredibly lucrative, but it’s also fraught with potential pitfalls. Many novice traders fall prey to common mistakes that can quickly erode their capital and derail their trading journey. Understanding these mistakes and implementing preventative measures is crucial for long-term success. This section highlights five frequent errors and offers practical strategies to avoid them.
Overtrading and Emotional Decisions
Overtrading, driven by impatience or emotional responses to market fluctuations, is a major culprit in forex losses. The thrill of quick profits can lead traders to make impulsive decisions, disregarding risk management strategies and sound analysis. This often results in a series of losing trades that quickly deplete accounts. To prevent this, traders should establish a clear trading plan with predefined entry and exit points, stick to their allocated risk per trade, and maintain a trading journal to track their performance and emotional responses. Discipline and patience are key. For example, a trader might set a maximum number of trades per day or week, regardless of market conditions.
Ignoring Risk Management
Ignoring risk management is akin to sailing without a compass. Without a defined risk management plan, even a winning strategy can lead to significant losses. This includes not using stop-loss orders, overleveraging, or failing to diversify your portfolio. Consequences include substantial losses and potential account wipeouts. Best practices include determining a maximum risk percentage per trade (e.g., 1-2% of your account balance), consistently using stop-loss orders to limit potential losses, and diversifying trades across different currency pairs to mitigate risk. For example, a trader with a $10,000 account should risk no more than $100-$200 on any single trade.
Lack of a Trading Plan
Trading without a well-defined plan is like driving without a destination. Without a clear strategy outlining entry and exit points, risk management parameters, and trading goals, traders are susceptible to impulsive decisions and inconsistent performance. This leads to unpredictable results, making it difficult to learn from mistakes and improve trading skills. A comprehensive trading plan should encompass market analysis techniques, risk management strategies, and clear entry and exit rules for each trade. Regularly reviewing and adapting the plan based on market conditions and performance is essential.
Insufficient Education and Preparation
Jumping into forex trading without adequate knowledge is like trying to climb Mount Everest without proper training. Many novice traders underestimate the complexity of the forex market and fail to invest sufficient time in learning fundamental and technical analysis, risk management, and trading psychology. This leads to uninformed decisions, significant losses, and a lack of confidence. Thorough education, including studying market dynamics, chart patterns, and risk management techniques, is crucial. Utilizing demo accounts to practice trading strategies before risking real capital is also highly recommended.
Chasing Losses
Chasing losses is a common psychological trap that can lead to devastating consequences. After experiencing a losing trade, some traders try to recover their losses quickly by increasing their position size or trading more frequently. This often results in further losses and exacerbates the initial setback. A disciplined approach involves accepting losses as part of trading and focusing on managing risk rather than trying to recoup losses immediately. Sticking to the trading plan and avoiding emotional reactions is crucial. For example, instead of doubling down after a loss, a trader should review their strategy and adjust it if necessary before entering another trade.
Closing Summary

So, there you have it – a crash course in forex trading terminology. Remember, understanding the language is only half the battle. Consistent learning, practice, and disciplined risk management are crucial for success in this dynamic market. Don’t be afraid to experiment (maybe start with a demo account!), but always approach forex trading with a strategic mindset and a healthy dose of caution. The world of forex awaits – are you ready to conquer it?
Detailed FAQs
What’s the difference between a demo and a live forex account?
A demo account uses virtual money, letting you practice trading without risking real funds. A live account uses real money, exposing you to actual market conditions and potential profits/losses.
What are some common indicators used beyond moving averages, RSI, and MACD?
Other popular indicators include the Stochastic Oscillator, Bollinger Bands, and the Average Directional Index (ADX). Each offers unique insights into market momentum and volatility.
How can I find reliable sources for forex news and analysis?
Reputable financial news websites, economic calendars, and forex brokers often provide insightful analysis and market updates. Always cross-reference information from multiple sources.
What are some good resources for learning more about forex trading?
Many online courses, books, and educational platforms offer in-depth forex trading education. Look for reputable sources with experienced instructors.
Notice A Beginner’s Guide to Forex Spread Betting for recommendations and other broad suggestions.