How to Trade Forex Using Price Action: Unlocking the secrets of the market isn’t about complex algorithms or crystal balls; it’s about understanding the language of price. This guide dives deep into price action trading, showing you how to decipher candlestick patterns, identify crucial support and resistance levels, and ultimately, make smarter, more informed trading decisions. Forget the noise; let’s focus on what the market is *actually* telling you.
We’ll break down the fundamental principles, guiding you through identifying trends, spotting potential reversals, and mastering risk management techniques. From interpreting simple candlestick formations to leveraging trendlines and channels, you’ll learn a practical, actionable approach to forex trading that puts you in control. Get ready to transform your trading game.
Understanding Price Action Fundamentals
Price action trading is a powerful technique that focuses on interpreting market movements directly from price charts, rather than relying heavily on indicators. It’s all about reading the market’s language – the highs, lows, and the way the price moves between them – to predict future price direction. This approach allows traders to identify potential entry and exit points with greater precision and potentially reduce reliance on lagging indicators. Mastering price action requires discipline, practice, and a keen eye for detail.
Price action analysis relies on several core principles. Firstly, it emphasizes the importance of supply and demand. Highs represent areas of supply (where sellers are abundant), while lows signify areas of demand (where buyers are prevalent). Secondly, it focuses on identifying patterns in price movement that repeat themselves over time. These patterns can be used to anticipate future price action. Finally, price action traders prioritize objective analysis, relying on visual cues from the chart rather than subjective interpretations.
Candlestick Patterns
Candlestick patterns are a fundamental component of price action trading. Each candlestick represents the price movement over a specific time period (e.g., one hour, one day). The body of the candlestick indicates the difference between the opening and closing prices, while the wicks (shadows) show the high and low prices for that period. Different candlestick patterns signal different market sentiments and potential price movements. For example, a bullish engulfing pattern, where a large green candlestick completely engulfs a preceding red candlestick, often signals a potential price reversal to the upside. Conversely, a bearish engulfing pattern suggests a potential reversal to the downside. Other common patterns include hammers, hanging men, dojis, and shooting stars, each carrying its own unique interpretation.
Chart Patterns
Beyond individual candlesticks, price action traders also look for larger chart patterns formed by the connecting price action over a longer period. These patterns can span several days, weeks, or even months. Common chart patterns include triangles (symmetrical, ascending, descending), head and shoulders (both bullish and bearish variations), double tops and bottoms, and flags and pennants. These patterns provide context to the short-term price action, often suggesting continuation or reversal of an existing trend. For example, a breakout from a symmetrical triangle can often lead to a significant price move in the direction of the breakout.
Using Price Action Patterns to Identify Trading Opportunities
Price action patterns don’t guarantee profits, but they significantly increase the probability of successful trades. Traders look for confirmation signals, such as volume changes or other technical indicators, to support their interpretations of price action patterns. For instance, a bullish engulfing pattern confirmed by increased volume significantly strengthens the signal. Successful traders also use risk management techniques, such as stop-loss orders, to protect their capital. A trader might place a stop-loss order below the low of the engulfing pattern to limit potential losses if the trade goes against them. They will also define a target price, based on previous price action and potential support/resistance levels, to determine when to take profits.
Comparison of Price Action Patterns
| Pattern | Strengths | Weaknesses | Example |
|---|---|---|---|
| Bullish Engulfing | Clear reversal signal, easy to identify | False signals can occur, requires confirmation | A large green candlestick completely covers a preceding red candlestick, suggesting a shift from bearish to bullish sentiment. |
| Head and Shoulders | Strong reversal signal, clear price targets | Formation takes time, can be difficult to identify early | A pattern resembling a head and two shoulders, indicating a potential trend reversal. The neckline serves as a key support/resistance level. |
| Triangle | Predictable breakouts, clear price targets | Can be range-bound for extended periods, false breakouts can occur | A pattern formed by converging trendlines, suggesting a period of consolidation before a breakout. |
| Flag | Continuation pattern, clear trend direction | Requires a preceding strong trend, can be difficult to distinguish from other patterns | A short period of consolidation within a larger uptrend or downtrend, indicating a temporary pause before the trend resumes. |
Identifying Support and Resistance Levels: How To Trade Forex Using Price Action
Support and resistance levels are crucial in price action trading because they represent areas where the price is likely to pause, reverse, or consolidate. Understanding these levels allows traders to identify potential entry and exit points, manage risk, and ultimately, improve their trading strategies. Essentially, they’re like invisible walls in the market.
Identifying these key levels requires a keen eye and a methodical approach. Several methods can help pinpoint support and resistance, each offering a unique perspective on market dynamics.
Swing Highs and Swing Lows
Swing highs and lows represent significant price peaks and troughs within a specific timeframe. A swing high is formed when the price reaches a peak before reversing lower, while a swing low marks a trough before the price moves higher. These points often act as strong levels of support and resistance, respectively. For example, if the price consistently bounces off a previous swing low, it suggests a strong support level. Conversely, if the price repeatedly fails to break through a previous swing high, it indicates a strong resistance level. Traders can use these points to set stop-loss orders (to limit potential losses) and take-profit orders (to secure profits).
Trendlines, How to Trade Forex Using Price Action
Trendlines are lines drawn to connect a series of swing highs or swing lows, visually representing the direction of the price trend. An uptrend is characterized by a series of higher highs and higher lows, while a downtrend shows lower highs and lower lows. Uptrend trendlines, drawn connecting swing lows, act as support, while downtrend trendlines, connecting swing highs, act as resistance. A break above an uptrend line often signals a continuation of the uptrend, whereas a break below a downtrend line may indicate a continuation of the downtrend. The steeper the trendline, generally, the stronger the trend, although exceptions always exist.
Fibonacci Retracements
Fibonacci retracements are based on the Fibonacci sequence, a mathematical sequence where each number is the sum of the two preceding ones (e.g., 1, 1, 2, 3, 5, 8, 13, etc.). These retracement levels (23.6%, 38.2%, 50%, 61.8%, and 78.6%) are often used to identify potential support and resistance levels during price corrections within a trend. For instance, after a significant price move, a pullback to the 38.2% Fibonacci retracement level might act as support before the price resumes its original trend. These levels are not guaranteed to hold, but they offer valuable insight into potential price reversal points.
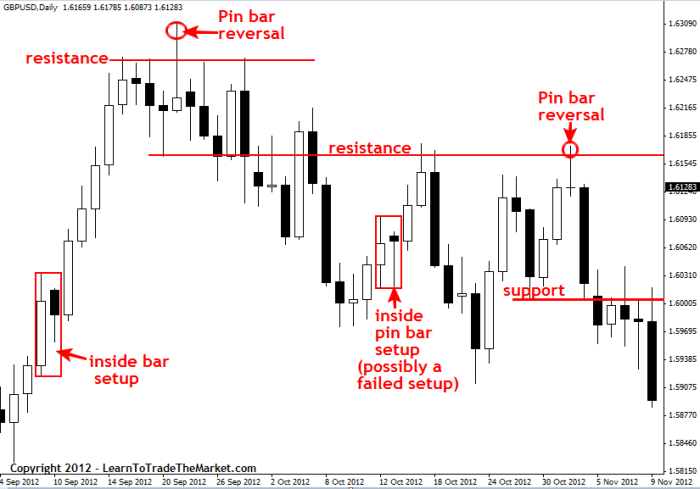
Visual Representation of Support and Resistance
Imagine a graph depicting price movement. In an uptrend, you’d see a series of higher highs and higher lows. A line connecting the lows forms the support level. If the price drops, it’s likely to bounce off this line, indicating a buying opportunity. Conversely, in a downtrend, a line connecting the highs forms the resistance level. If the price rises, it’s likely to encounter resistance at this line, presenting a potential selling opportunity. Consider a scenario where the price breaks above the resistance line in a downtrend; this is a bullish signal, suggesting a potential trend reversal. Conversely, a break below the support line in an uptrend could signal a bearish reversal. A sideways market, or consolidation, would show price fluctuating between well-defined support and resistance levels, creating a range-bound trading environment. In this range, a break above the resistance would signal a bullish breakout, while a break below the support would signal a bearish breakout. These breakouts often lead to significant price movements.
Analyzing Candlestick Patterns
Candlestick patterns are visual representations of price movements over a specific time period, offering valuable insights into market sentiment and potential future price direction. Understanding these patterns allows forex traders to anticipate reversals or continuations, enhancing their trading strategies and improving decision-making. They are not foolproof predictors, but when used in conjunction with other technical indicators and fundamental analysis, they significantly increase the probability of successful trades.
Candlestick Pattern Characteristics and Interpretations
Several candlestick patterns consistently appear in forex charts, each with unique characteristics and implications. Analyzing these patterns helps traders identify potential turning points or confirm existing trends. The reliability of a pattern often depends on its context within the broader market trend and the accompanying volume.
| Pattern Name | Description | Interpretation | Visual Representation |
|---|---|---|---|
| Hammer | A small real body (the actual price movement during the period) at the top of a long lower shadow (the difference between the low and the close). The upper shadow is typically short or nonexistent. | Signals a potential bullish reversal after a downtrend. The long lower shadow suggests buyers stepped in to prevent further price decline. | Imagine a small rectangle at the top of a long vertical line extending downwards. The rectangle represents the real body, and the line represents the lower shadow. |
| Inverted Hammer | A small real body at the bottom of a long upper shadow. The lower shadow is typically short or nonexistent. | Signals a potential bearish reversal after an uptrend. The long upper shadow indicates sellers prevented further price increases. | Imagine a small rectangle at the bottom of a long vertical line extending upwards. The rectangle represents the real body, and the line represents the upper shadow. |
| Engulfing Pattern (Bullish) | A larger bullish candlestick completely engulfs a preceding bearish candlestick. | Suggests a potential bullish reversal. The larger bullish candle shows buyers overpowering sellers. | Imagine a large green (bullish) candlestick completely surrounding a smaller red (bearish) candlestick. |
| Engulfing Pattern (Bearish) | A larger bearish candlestick completely engulfs a preceding bullish candlestick. | Suggests a potential bearish reversal. The larger bearish candle shows sellers overpowering buyers. | Imagine a large red (bearish) candlestick completely surrounding a smaller green (bullish) candlestick. |
| Doji | A candlestick with the opening and closing prices being virtually the same, resulting in a very small or nonexistent real body. It often has long upper and lower shadows. | Signals indecision in the market. It can be a potential reversal or continuation signal depending on its context and subsequent price action. | Imagine a candlestick with a very small or nonexistent body and long shadows extending both above and below. |
Examples of Candlestick Patterns in Forex Trading
Consider a scenario where the EUR/USD pair has been trending downwards. The appearance of a hammer candlestick could indicate that the downtrend might be nearing its end, as buyers are stepping in to support the price. If this is followed by a bullish engulfing pattern, the signal for a potential reversal is strengthened. Conversely, a bearish engulfing pattern after an uptrend in GBP/USD could suggest a shift in momentum towards a bearish trend. A doji candlestick appearing at the peak of an uptrend might signal indecision and a potential upcoming reversal. These examples highlight how candlestick patterns provide valuable contextual clues within the overall price action.
Using Trendlines and Channels
Trendlines and channels are invaluable tools in forex trading, offering a visual representation of price direction and potential breakout points. They help filter noise and identify high-probability trading setups, significantly improving your trading decisions. Mastering their application is crucial for consistent profitability.
Drawing and interpreting trendlines and channels involves identifying significant highs and lows on the price chart. Trendlines connect a series of swing highs (for downtrends) or swing lows (for uptrends), indicating the prevailing direction. Channels, on the other hand, are formed by drawing parallel trendlines, one connecting swing highs and the other connecting swing lows, creating a range within which the price tends to fluctuate. The slope of the trendline or channel reflects the strength of the trend; steeper slopes indicate stronger trends.
Trendline Drawing and Interpretation
Drawing accurate trendlines requires careful selection of swing highs and lows. These points represent significant shifts in momentum, not every minor fluctuation. Ideally, at least two points should be used to draw a trendline, with subsequent price action confirming its validity. A valid trendline should be touched or respected by the price multiple times. Breaks of trendlines, particularly after multiple touches, often signal significant shifts in market sentiment and can provide high-probability trading opportunities. For example, a bullish trendline broken to the downside might signal a potential reversal or at least a temporary pullback, offering a short selling opportunity.
Channel Drawing and Interpretation
Channels are constructed similarly to trendlines, but involve two parallel lines. One line connects swing highs, and the other connects swing lows. The space between these lines represents the price range. Channels provide a clearer picture of price volatility and potential support and resistance levels within a trending market. A breakout above the upper channel line often suggests a strong bullish continuation, while a break below the lower channel line often suggests a bearish continuation. For instance, observing a currency pair consistently trading within a rising channel, a breakout above the upper trendline would signal a potential buying opportunity.
Combining Trendlines and Channels with Other Indicators
Trendlines and channels are powerful tools on their own, but their effectiveness is amplified when combined with other price action indicators. For example, combining trendlines with candlestick patterns can help confirm trading signals. A bearish engulfing candlestick pattern forming near a downtrend line provides a stronger confirmation of a potential short selling opportunity than the trendline break alone. Similarly, using moving averages alongside channels can help identify potential entry and exit points. A price bounce off the lower channel line, coinciding with a bullish crossover of a fast and slow moving average, could be a strong buy signal. This multi-faceted approach reduces the risk of false signals and improves trading accuracy.
Risk Management Using Trendlines and Channels
Trendlines and channels aid in risk management by providing clear entry and exit points. Traders can set stop-loss orders just below the support level (for long positions) or above the resistance level (for short positions). Take-profit orders can be placed at a predetermined level, such as the upper channel line for long positions or the lower channel line for short positions. For example, a trader might place a stop-loss order below the lower trendline of an ascending channel and a take-profit order at the upper trendline. This predefined risk-reward ratio helps control potential losses and secure profits.
Combining Price Action with Other Indicators (Optional)
Price action, while powerful on its own, can be significantly enhanced by integrating it with other technical indicators. This isn’t about replacing price action; instead, it’s about using indicators to confirm signals, filter noise, and improve risk management. Think of it as adding another layer of validation to your trading strategy, boosting your confidence and potentially improving your win rate.
Combining price action with indicators allows for a more holistic view of the market. Price action provides the fundamental context – the raw language of supply and demand – while indicators offer quantitative measurements that can add further clarity and precision. This synergistic approach helps traders navigate the complexities of the forex market more effectively.
Indicator Combinations and Signal Filtering
Moving averages, for instance, can be used to confirm the direction of a price action trend. A bullish price action breakout above a key resistance level, coupled with the price crossing above a 20-period moving average, provides a stronger buy signal than the breakout alone. Conversely, a bearish engulfing candlestick pattern confirmed by a price drop below a 50-period moving average strengthens a sell signal. The Relative Strength Index (RSI), a momentum indicator, can help identify overbought or oversold conditions, potentially signaling a reversal. A bearish price action setup, such as a head and shoulders pattern, forming while the RSI is in overbought territory, significantly increases the likelihood of a price reversal. This combined approach helps filter out false signals and improves the accuracy of your trading decisions.
Risk Management Enhancements Through Combined Analysis
Integrating indicators into your price action strategy also significantly enhances risk management. For example, using a stop-loss order placed below a recent swing low, combined with the price breaking below a key support level identified through price action *and* confirmed by a moving average crossover, offers a more robust risk management strategy. Similarly, a profit target can be set based on price action projections (e.g., projecting a move based on the height of a previous swing), further reinforced by the price reaching a predetermined RSI level. This combination of methods allows for a more defined and secure trading plan.
Price Action Alone vs. Price Action with Indicators
Using price action alone emphasizes raw market dynamics and discipline. It requires a deep understanding of market psychology and chart patterns. The benefit is a cleaner, less cluttered chart, minimizing the risk of indicator-induced confusion. However, relying solely on price action can sometimes lead to missed opportunities or increased uncertainty, particularly in choppy or sideways markets.
In contrast, combining price action with indicators provides a more comprehensive perspective, potentially identifying subtle shifts in momentum or confirming existing price action signals. This approach can lead to more consistent trading results, but it also requires a higher level of understanding and potentially adds complexity to your analysis. The added information can sometimes lead to over-analysis or “paralysis by analysis”.
Advantages and Disadvantages of Supplementary Indicators
Let’s Artikel the pros and cons:
- Advantages:
- Improved signal confirmation and filtering.
- Enhanced risk management through more defined entry and exit points.
- Potential for identifying subtle market shifts and momentum changes.
- Increased trading confidence through multiple confirmations.
- Disadvantages:
- Increased complexity and potential for over-analysis.
- Risk of conflicting signals from different indicators.
- Potential for lagging indicators to obscure price action signals.
- Increased chart clutter, potentially hindering visual interpretation of price action.
Risk Management in Price Action Trading
Forex trading, while potentially lucrative, is inherently risky. Ignoring risk management is akin to sailing a ship without a compass – you might get lucky, but you’re far more likely to crash. Price action trading, while offering visual clarity, doesn’t negate the need for a robust risk management strategy. In fact, understanding price action often allows for more precise risk assessment and mitigation.
Successful forex trading hinges not just on identifying profitable trades, but on consistently protecting your capital. A well-defined risk management plan is your safety net, preventing devastating losses and allowing you to stay in the game long enough to reap the rewards. This involves setting clear stop-loss orders, defining appropriate take-profit targets, and employing effective position sizing techniques.
Discover more by delving into The Best Forex Trading Courses in 2025 further.
Determining Stop-Loss and Take-Profit Levels
Stop-loss and take-profit levels are crucial for defining your risk and reward ratio. In price action trading, these levels are often determined based on key support and resistance levels, candlestick patterns, and trendline breaks. For example, if you’re entering a long position based on a bullish engulfing candlestick pattern at a support level, your stop-loss might be placed just below the low of the engulfing candle, representing a small risk relative to your potential reward. Conversely, your take-profit could be set at a nearby resistance level, or perhaps at a Fibonacci retracement level calculated from the previous swing high to low. The exact placement depends on the specific price action setup and your risk tolerance. A conservative approach might involve a 1:2 or 1:3 risk-reward ratio, meaning you risk $1 to potentially gain $2 or $3.
Effective Position Sizing Techniques
Position sizing is about determining how much capital to allocate to each trade. It’s crucial to avoid risking too much on any single trade. A common approach is to risk a fixed percentage of your trading account on each trade, typically 1% to 2%. For example, if your account balance is $10,000 and you risk 1%, you would only risk $100 per trade. This ensures that even a series of losing trades won’t wipe out your entire account. The calculation involves determining your stop-loss in pips and converting it into a monetary value based on your account currency and lot size. This ensures that the maximum loss per trade remains within your pre-defined risk percentage.
Risk Management Techniques to Protect Capital
Several techniques enhance capital protection. Diversification involves spreading your trades across different currency pairs, reducing your exposure to any single market’s volatility. Using trailing stop-losses allows you to lock in profits as the trade moves in your favor, while still protecting against potential reversals. Regularly reviewing your trading journal, analyzing both winning and losing trades, helps to identify patterns, improve your strategy, and refine your risk management approach. Finally, never trade with borrowed money or more than you can afford to lose. This emotional discipline is paramount to long-term success.
Practical Application and Trading Strategies
Putting price action theory into practice requires a disciplined approach and a keen eye for detail. Successfully trading forex using price action isn’t about predicting the future; it’s about identifying high-probability setups based on past price movements and reacting accordingly. This section details a step-by-step strategy, provides examples, and offers tips for maximizing your success.
A Step-by-Step Price Action Trading Strategy
This strategy focuses on identifying clear trend reversals using candlestick patterns and support/resistance levels. It prioritizes risk management to protect capital while aiming for consistent, manageable profits.
- Identify the Trend: Before entering any trade, determine the dominant trend (uptrend, downtrend, or sideways). This can be done by observing higher highs and higher lows for uptrends, lower highs and lower lows for downtrends, or a lack of clear direction for sideways markets.
- Locate Support and Resistance: Pinpoint key support and resistance levels on the chart. These are areas where price has historically struggled to break through. Previous swing highs and lows often serve as excellent indicators of these levels.
- Look for Candlestick Pattern Confirmation: Wait for a candlestick pattern that confirms a potential reversal at a support or resistance level. For example, a bullish engulfing pattern at support could signal a potential long entry, while a bearish engulfing pattern at resistance might indicate a short entry. Other patterns like hammers, shooting stars, or dojis can also provide confirmation.
- Place Your Trade: Enter your trade based on the confirmed reversal signal. Place your stop-loss order just below the support level (for long trades) or above the resistance level (for short trades) to manage risk.
- Set Your Take-Profit: Determine your take-profit target based on the risk-reward ratio you’re comfortable with. A common ratio is 1:2 or 1:3, meaning you aim for a profit twice or thrice the size of your potential loss.
- Monitor and Manage Your Trade: Continuously monitor your trade and adjust your stop-loss or take-profit levels as needed based on market conditions. Consider trailing your stop-loss to lock in profits as the price moves in your favor.
Examples of Identifying Potential Trades
Let’s illustrate with two scenarios:
Scenario 1: Long Trade Setup
Imagine the EUR/USD pair is in a clear downtrend, but price has reached a strong support level near 1.1000. A bullish engulfing pattern forms at this level, with a large green candle engulfing the previous red candle. This suggests a potential reversal to the upside. A trader might enter a long position with a stop-loss order slightly below 1.1000 and a take-profit target at 1.1100 (a 1:10 risk-reward ratio).
Scenario 2: Short Trade Setup
Consider the GBP/USD pair in an uptrend, but price reaches a significant resistance level at 1.3000. A bearish engulfing pattern appears, with a large red candle engulfing the previous green candle. This signals a potential reversal to the downside. A trader might enter a short position with a stop-loss order slightly above 1.3000 and a take-profit target at 1.2900 (again, a 1:10 risk-reward ratio).
Tips and Best Practices for Successful Price Action Trading
Successful price action trading requires discipline, patience, and a thorough understanding of market dynamics. Here are some key tips:
- Focus on High-Probability Setups: Don’t force trades. Only enter positions when the price action clearly indicates a high-probability setup.
- Use a Consistent Trading Plan: Develop a detailed trading plan that Artikels your entry and exit strategies, risk management rules, and position sizing guidelines.
- Practice Proper Risk Management: Always use stop-loss orders to limit potential losses. Never risk more than a small percentage of your trading capital on any single trade.
- Be Patient and Disciplined: Avoid emotional trading. Stick to your trading plan and don’t let fear or greed influence your decisions.
- Continuously Learn and Adapt: The forex market is constantly evolving. Stay updated on market trends and refine your trading strategies as needed.
Sample Trade Breakdown
| Step | Action | Details | Outcome |
|---|---|---|---|
| 1 | Identify Trend | Downtrend in GBP/USD | Observed lower highs and lower lows |
| 2 | Locate Support | Support level at 1.2500 | Based on previous swing lows |
| 3 | Candlestick Confirmation | Bullish engulfing pattern at 1.2500 | Large green candle following a red candle |
| 4 | Trade Entry | Long position at 1.2500 | Stop-loss at 1.2480, Take-profit at 1.2600 |
| 5 | Trade Monitoring | Price moves to 1.2580 | Take-profit triggered, trade closed |
End of Discussion
Mastering forex trading using price action isn’t a get-rich-quick scheme; it’s a journey of learning, discipline, and consistent practice. By understanding the core principles of price action, identifying key support and resistance levels, and interpreting candlestick patterns, you’ll equip yourself with the tools to navigate the forex market with confidence. Remember, risk management is paramount – protect your capital, and let your trading strategy guide your decisions. The market whispers its secrets; learn to listen.
Question & Answer Hub
What’s the difference between a bullish and bearish engulfing pattern?
A bullish engulfing pattern shows a smaller bearish candle engulfed by a larger bullish candle, suggesting a potential price reversal to the upside. A bearish engulfing pattern is the opposite: a smaller bullish candle is engulfed by a larger bearish candle, hinting at a potential price reversal downwards.
How much capital should I risk per trade?
A common guideline is to risk no more than 1-2% of your total trading capital on any single trade. This helps to manage risk and prevent significant losses.
Can I use price action with other indicators?
Absolutely! Combining price action with indicators like moving averages or RSI can help confirm signals and filter out noise, but it’s crucial to understand how to interpret them together effectively.
How long does it take to become proficient at price action trading?
Proficiency takes time and dedicated practice. Consistent learning, backtesting strategies, and disciplined trading are key. There’s no magic number, but consistent effort will yield results.
Explore the different advantages of How to Use Stochastic Oscillator in Forex Trading that can change the way you view this issue.